Healthdirect Australia Help Center

    Navigating the Clinic Waiting area

    Find out all about the clinic waiting area and how simple it is to navigate and conduct consultations
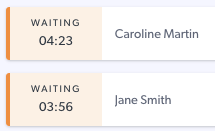
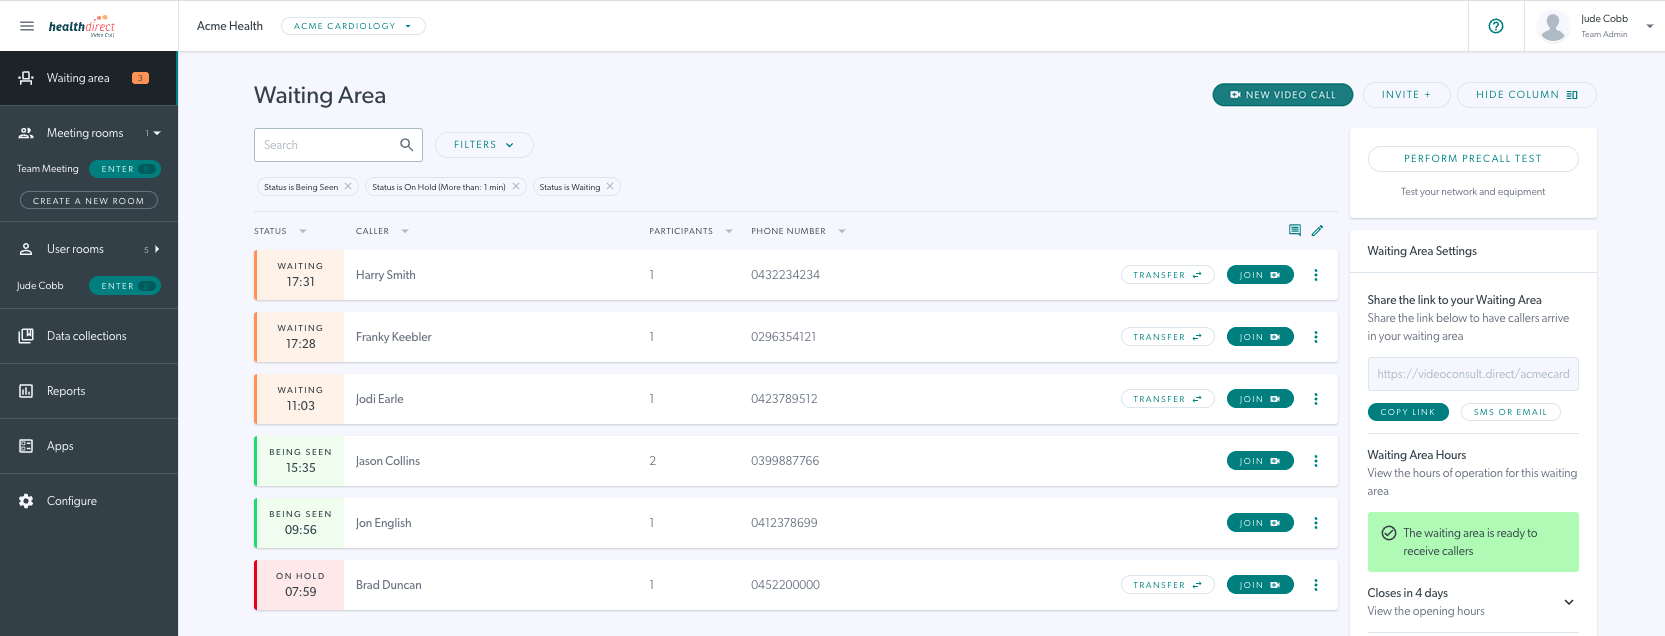
    Your Clinic Waiting Area is where you will see your patients or clients waiting for, on hold, or participating in, a video consultation with your service. You will see information including their name and phone number, as well as any other information your clinic administrator configures.

    Example clinic waiting area with waiting callers, as well as callers being seen and on hold:

    How to navigate the various sections in the waiting area

    Watch the video:


    There are various elements in the clinic waiting area, including caller information and waiting area settings. Click on the headings below to see detailed information.

    All Callers: status, information, activity, joining a call and ending a call

    Your Clinic Waiting Area is where you will see your patients waiting for, or participating in, a video consultation with your service.
    When you first arrive in your Waiting Area , you will see any current callers in the waiting area, with their status showing to the left of their details.

    The top example to the right shows a clinic with no current caller activity. The bottom example shows 3 waiting callers in the clinic waiting area.


    All callers in the waiting area have their own line, showing all the required information they have entered.
    Their status will be one of the following:
    • Waiting (orange, changing to darker orange if waiting more than 30 mins).
    • Being Seen (green)
    • On hold (red)

    For each caller you will be able to access further information regarding participants, call activity and any extra patient entry fields required by the clinic. To see this information click on the three dots to the right of a caller's entry.

    Please note: Any signed in team member/administrator for your clinic can access this information. 
    Notify
    To send a notification to a waiting patient before you begin a Video Call consultation - for example, to let a patient know that the clinic is running late - you can use the Notify function.
    To access this function click on the three dots to the right of that caller's information and select Notify.
    • If any notifications have been sent to this caller already, you will see a number next to Notify. You will also see this number in the clinic waiting area in a small blue circle to the top right of the 3 dots.
    • Type a custom notification to the caller in the dialogue box and click on the send icon.
    • The patient will receive your notification in their screen while they are waiting to be seen.


    Join a call
    Locate your next patient/client and simply click on their Join button to start the consultation.

    If configured in your clinic, a pop-up confirmation box will appear, showing who you are about to join the call with. A host is a service provider with an account and a guest is a patient/client. If the name that comes up is not who you intended to join the call with you can click cancel and join the correct caller.
    If the confirmation box is not configured in your clinic, when you click Join your video consultation will begin without the confirmation.

    Click here for more information.
    Participants
    To view participants in a call, click on the three dots to the right of the caller card and select Participants.
    Expand a participant's information by clicking on the arrow to the right of the participant name.
    Here you will see:
    • camera
    • microphone
    • browser, 
    • device, and 
    • bandwidth information

    You can also disconnect the caller from here, if appropriate.

    If a caller is waiting to be seen or on hold they will be the only participant in the call.
    Activity
    To view call activity for a particular call, click on the three dots to the right of that caller and select Activity.

    Here you will see an activity log for a particular call. This includes any information your clinic has requested callers to provide as they are starting the call (eg medicare number or date of birth). These fields are configured in the Entry Fields in the clinic configuration section of the platform.

    End Call
    Click on End Call to end a call currently in progress, or to end a call for a caller waiting or on hold, if required.

    A confirmation screen will show the participant/s who will be disconnected from the call and gives a chance to confirm that this is the action you would like to perform.

    Please note: Calls are usually ended by the clinician in the Video Call consultation with a patient/client from within the call screen. Ending a call from the Clinic Waiting Area  is optional and available if required.

    Searching, customisation, sorting and filtering

    The waiting area design includes functionality for customising the waiting area view, including searching for callers, customising your column view, sorting and filtering by status.

    Searching:

    Typing in a word or number will show any caller cards that contain the key word or number typed in.
    This can help locate callers in busy clinics with many people waiting, being seen and on hold.
    When search has filtered out some callers you will be alerted in the grey bar below the search results.

    Remove the text or number you have entered in the Search box to see all callers.

    Customisation:

    Account holders can customise their default waiting area view by selecting from the available Entry Field (column) options. They can also edit the order of the Entry Fields for their view. The default view is configured by the clinic administrator and any caller entry information can also be found in Activity and Edit Details by clicking on the 3 bars to the right of the caller's card. If you would like to edit or reorder the columns you see in in the waiting area for all callers, follow these steps:

    Your clinic admin will set up the default columns team members will see in the Waiting Area for each caller.

    In this example we can see Caller name, Participants, Phone number, Email address, Patient notes and Name of Doctor (there are many columns so Patient Age is not showing due to space).

    Users can click on the pen icon to edit the default view for your account, if desired. This edit function is optional and allows you flexibility regarding the clinic waiting area view you prefer,

    All Entry Fields will show and some will be selected while others may not, depending on the default columns set in the clinic. Users can edit which columns they would like to view in the caller information, by selecting the desired columns and then clicking Save.

    Only the ticked columns will show in the user's view. This can help if the view has a lot of columns selected and is crowded.

    Click Save to save that change to your view.


    Now the user only sees the columns selected in the above example. Email Address and Patient Age will no longer show in this view, however it can be edited at any time.
    Remember that all patient entry fields can be viewed by clicking on the 3 dots to the right of the caller card and selecting either Activity or Edit Details. 

    Users can decide which fields they would like to view as a column and which ones they are happy to view in either of these sections inside the 3 dots.

    Edit Details is explained in another dropdown section on this page
    Re-ordering Entry Fields (columns)
    The up and down arrows next to each Entry Field allows users to reorder the columns for their view, so they can customise to suit their needs.

    The Columns will show in the Waiting Area in the order that has been saved by the user. Remember that this will not affect any other team members, as it is an individual user's editing and viewing option.

    Sorting:

    Callers can be sorted by clicking on the arrow next to the columns you have in your waiting area view. All columns have a sort option and this can help you find what you need quickly and easily, even in a busy clinic waiting area. For example you can sort by:
    Status Sorts by the duration the call has been active for
    Caller Name Caller name sorts in alphabetical order. Here is an example:
    Participants Sorts callers by how many participants are in the call
    Phone number Sorts by number

    Filtering:

    You can filter by status type, time and by any Entry Fields that have been set as filterable by your clinic admin, to help navigate the list of callers in the waiting area. 

    Please note: any filters you apply are only for your account. They will not affect the view of other team members. Filters applied will not persist once you sign out.

    When you sign in you will see all callers either waiting, being seen or on hold in the clinic waiting area.

    Click on the Filters button next to the Search bar to filter by status or Entry Field and select the desired option/s. In the dropdown you will see filtering options, with enhanced functionality for filtering by time waiting, on hold and being seen, as well as by the information in any of the Entry Fields (columns) for the clinic.  
    To filter out a status completely, click on the X in the desired status button under the Search bar. This will filter out all callers with that status. 

    Filters can be reset to the defaults by clicking on the Defaults button, inside the Filters menu.
    If you add a duration to a filter, you will see this reflected in the relevant status button below the Search bar. 

    In this example, the filter is showing all callers in Waiting Status that have been waiting for more than 5 mins, as indicated in the highlighted status box.
    In this example we have filtered out any callers with Being Seen status, by clicking the X in the Being Seen box and removing it from view (as shown highlighted in red).

    A grey box below the caller information alerts you if any callers are currently filtered out. Filters can be reset by clicking on the Filters dropdown and clicking on the Reset Filters.
    To filter by any of the information in the columns available in your clinic, click on Filter and you will see the fields/columns available for filtering. Add a keyword to filter by under the column heading and then click on Filter at the bottom.

    In this example we are filtering to show only patients who have entered Joel as the doctor's name ( image 1), therefore we are only seeing that doctor's patients displayed (image 2).
    Image 1Image 2
    Delete

    Editing Entry Fields (columns) in the Waiting Area

    Entry Fields show as columns in the Waiting Area and are configured by the clinic administrator. They can be patient facing or they can set to be internal use only. Entry fields that are presented to patients can be configured as 'editable' and internal use only fields will always be editable from the Clinic Waiting Area. This means that all team members in a clinic can edit fields that are set as editable in the Waiting Area and the information in the columns will update for all other team members. Your clinic can work out the processes for this, such as the protocols for editing and adding information. 

    This video shows how health service providers can view and edit Entry Field information in the Clinic Waiting Area.

    To view and edit Entry Field information in the Waiting Area:

    Sign in and access your clinic. You will see all current caller activity, with the available columns showing any information added either by the patient or by one of your colleagues.
    In this example you can see a column called Patient Notes, which does not yet contain any information.
    This field has been configured as internal use only and is editable from the Waiting Area. This means team members can add patient notes, as required.
    To edit information in a caller's information, click on the 3 dots to the right of the caller's information and select Edit Details.
    You will see all the fields available to be edited - the fields greyed out in this example are not configured to be editable. You can edit any field not greyed out in this section.

    In this example the Name of Doctor and Patient Notes fields are editable.

    In this example we have added some information in the Patient Notes, which is a text area column set for internal use only. The patient doesn't see these details, however your colleagues will, once you click Save.
    Once saved, this information is now available in the Waiting Area column.
    You can see that the information has been added but only the first section of text is viewable, due to the column width.
    To see the full comments in the text box for patient notes in the Waiting Area view, hover over the text. 
    You can hover over any text to view the full details.
    To view all the caller information and activity you can click on the 3 dots and select either Activity (image 1) to scroll through the activity and information, or Edit Details to view and edit information (image 2).

    Note that in Activity, you can see which team member has edited or added the details and the timeline of all activity.

    Please note: Any information entered by the patient when they entered or a team member in the clinic will not be saved once the call ends, so if any information needs to be saved, by copying and pasting into the appropriate document before the end of the consultation.
    Image 1Image 2
    Delete

    RHS column including Waiting Area Settings

    The column on the right of the clinic waiting area includes the Precall Test and Waiting Area Settings, where you will find important clinic information.

    Please note: The RHS column can be hidden from view and shown as required for your account, as shown below.
    Show/Hide RHS column
    If hidden, there will be more space to view the the caller information in the middle column of the waiting area, which will be useful for smaller screens.

    In the first example to the right, the RHS column is showing and you can access Precall Test and all Waiting Area Settings. You can see the Hide Column button.

    In the second example, the RHS column has been hidden and clicking on Show Column will bring it back into view. 
    Remember that the Invite button is always visible at top right and provides quick access to the SMS or Email function for inviting patients/clients to the waiting area for their appointment.

    Precall test
    You can perform a precall test which will test your network and equipment.
    You can do this when you first start using Video Call and you only need to do another test if you are experiencing issues or if you change your device or modem.
    Share the link to your Waiting Area -
    This is the link your patients/clients need to arrive in your waiting area.
    You can copy the clinic link and paste into an email or patient appointment leaflet, for example.
    You can also send an invitation to the waiting area via email or SMS as outlined below.
    Send an Email or SMS invitation to your waiting area. Click on SMS or Email under Share the link to your Waiting Area and a dialogue box will open. Select either Send Email or Send SMS at the top, type in the required details and click on either Send Email or Send SMS at bottom right (blue button) to send the invitation.
    Please note: the invitation message is default text and can be edited before you send the invitation.

    The email or SMS that the invited person receives contains a link to start a call in the required waiting area.
    Please note: The Invite button at the top right of the clinic waiting area provides quick access to the SMS or Email invitation box. This will be visible at all times, even when the RHS column is hidden from view.
    Alerts
    Alerts can be set under Your Settings. 
    You can customise how and when you are notified of new callers in the clinic via SMS, Email and Desktop alerts. To configure these click on the down arrow next to each option. Read more:
    Step-by-step instructions on how to set up and receive Waiting Area alerts

    Please note: Setting up alerts is an optional feature that may or may not suit your workflow.
    Waiting Area Hours (expand and collapse this section by clicking on the arrow)
    You can view the clinic’s waiting area hours. You cannot edit the hours here - go to Configure your Clinic Waiting Area to do this if you are a clinic administrator.
    Support - this shows all support contacts for the clinic and, if any have been added at the organisation level, the organisation. This is information only, if you want to edit the support contacts go to the Configure section of the clinic.
    Microphone and Camera - this section allows you to quickly configure the clinic default call setup (calls are joined with the camera on/off, with the mic on/off).

    Clinic name and LHS menu

    At the top of the Waiting Area you will see the organisation name and the name of the clinic.
    Clicking on the drop down arrow next to the clinic name shows you any other clinics you have access to and you can choose any of these to navigate to another clinic waiting area.
    The LHS of the Clinic shows the various menu items, depending on your role in the clinic.

    If you are a clinic administrator you will see the and Reports, Apps and Configure buttons shown here. Team members (service providers) do not have access to these functions.

    Users may also see the Data collections menu item shown in this example. They will only see this if 'Data Collections' has been selected in permissions when they were invited to the clinic (we recommend admins do not select this option in the invitation box). Please ignore this item if you see it, as it is not applicable for most clinics on the platform.

    Clicking on the Menu icon (hamburger) at top left will hide the names of the menu items, leaving the icons in view for ease of use and mobile device responsiveness.


    Can’t find what you’re looking for?

    Email support

    or speak to the Video Call team on 1800 580 771

    Internal Content